Skip to content

Terraform

trivy Automating Security Scanning Applied to Terraform Resources

Introduction

Security is a vital concern when managing infrastructure, and it’s critical to identify vulnerabilities in both container images and infrastructure-as-code (IaC). While Terraform helps automate the deployment of cloud resources, combining it with security tools like trivy ensures that any configuration or resource vulnerabilities are caught early.

In this post, we will walk through how to integrate trivy into your Terraform workflow to automate security scanning of the resources you define. We will cover setting up trivy, running scans, and interpreting the results, ensuring your Terraform-managed infrastructure is as secure as possible.

Use case

It’s important to recognize that Trivy is a versatile security tool capable of scanning a wide range of resources, including container images, file systems, and repositories. However, in this post, we will focus specifically on scanning Infrastructure as Code (IaC) through Terraform configuration, utilizing Trivy’s misconfiguration scanning mode.

The Terraform configuration scanning feature is accessible through the trivy config command. This command performs a comprehensive scan of all configuration files within a directory to detect any misconfiguration issues, ensuring your infrastructure is secure from the start. You can explore more details on misconfiguration scans within the Trivy documentation, but here we’ll focus on two primary methods: scanning Terraform plans and direct configuration files.

Method 1: Scanning with a Terraform Plan

The first method involves generating a Terraform plan and scanning it for misconfigurations. This allows Trivy to assess the planned infrastructure changes before they are applied, giving you the opportunity to catch issues early.

cd $DESIRED_PATH
terraform plan --out tfplan
trivy config tfplan
  • The terraform plan --out tfplan command creates a serialized Terraform plan file.
  • trivy config tfplan then scans this plan for any potential security risks, providing insights before applying the configuration.

Method 2: Scanning Configuration Files Directly

Alternatively, you can scan the Terraform configuration files directly without generating a plan. This is useful when you want to perform quick checks on your existing code or infrastructure definitions.

cd $DESIRED_PATH
trivy config ./ 

This command instructs Trivy to recursively scan all Terraform files in the specified directory, reporting any misconfigurations found.

Trivy installation

For installation instructions please refer to the oficial documentation

See it in action

Automating the Scans in a CI/CD Pipeline

A good strategy is integrating trivy scans into your CI/CD pipeline. As an example we can expose it through github Actions, the official action can be found here,but as an easy alternative this pipe can be definied:

# GitHub Actions YAML file
name: Terraform Security Scanning

on: [push]

jobs:
  scan:
    runs-on: ubuntu-latest
    steps:
    - name: Checkout repository
      uses: actions/checkout@v2

    - name: Install trivy
      run: |
        curl -sfL https://raw.githubusercontent.com/aquasecurity/trivy/main/contrib/install.sh | sudo sh

    - name: Run trivy scan
      run: trivy config --severity HIGH,CRITICAL --exit-code 1 .

Conclusion

Summarize the importance of security scanning in the Terraform workflow and how using trivy automates this process. Encourage readers to integrate scanning tools into their infrastructure deployments for proactive vulnerability management.

terraform-docs: A Cool Way of Documenting Terraform Projects

What Is It?

terraform-docs is a utility that generates documentation from Terraform modules in various output formats. It allows you to easily integrate documentation that displays inputs, outputs, requirements, providers, and more! It supports several output formats—my personal favorite is Markdown.

What Does It Look Like?

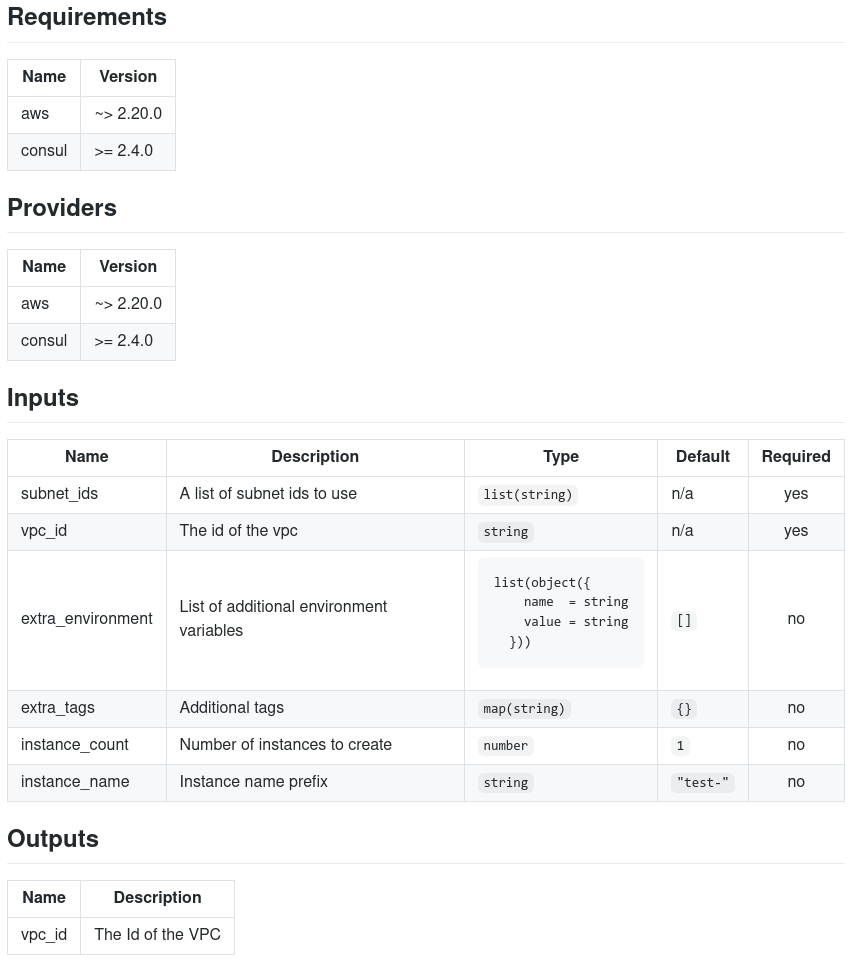
An example from the official documentation provides a clear illustration of how the module works, making it much easier for users to understand its usage. Below is an image demonstrating this example.

Markdown Table Output
Screenshot of a markdown table generated by `terraform-docs`.

Installation

As the installation process may change over time, please refer to the official documentation.

Options

You need to define a .config directory inside the directory where you want to generate the documentation. In this file, we define:

  • formatter: Set to Markdown, which I recommend.
  • output: Set to README.md, which is the default file for displaying content in a repository.
  • sort: To enable sorting of elements. We use the required criteria that sorts inputs by name and shows required ones first.
  • settings: General settings to control the behavior and the generated output.
  • content: The specific content to include in the documentation.

Minimal Configuration

formatter: "markdown"

output:
  file: "README.md"

sort:
  enabled: true
  by: required

settings:
  read-comments: false
  hide-empty: true
  escape: false

content: |-
  {{ .Requirements }}

  {{ .Modules }}

  {{ .Inputs }}

  {{ .Outputs }}

For more details about the configuration, please refer to this guide

Integration with Github Actions

To use terraform-docs with GitHub Actions, configure a YAML workflow file (e.g., .github/workflows/documentation.yml) with the following content:

name: Generate terraform docs

on:
  pull_request:
    branches:
      - main

jobs:
  terraform:
    name: "terraform docs"
    runs-on: ubuntu-latest

    # Use the Bash shell regardless whether the GitHub Actions runner is ubuntu-latest, macos-latest, or windows-latest
    defaults:
      run:
        shell: bash

    steps:
      # Checkout the repository to the GitHub Actions runner
      - name: Checkout
        uses: actions/checkout@v2

      # Install the latest version of Terraform CLI
      - name: Check docs
        uses: terraform-docs/gh-actions@v1.0.0
        with:
          output-file: README.md
          fail-on-diff: true

See it in action

Here's an example of terraform-docs being used in a personal module I developed.

Terragrunt Raise the DRY flag

If you're familiar with Infrastructure as Code (IaC) tools, this post is for you. The goal here is to introduce you to Terragrunt, a tool that enables you to follow the DRY (Don't Repeat Yourself) principle, making your Terraform code more maintainable and concise.

What it is?

Terragrunt is a flexible orchestration tool designed to scale Infrastructure as Code, making it easier to manage Terraform configurations across multiple environments.

Let's present the problem.

Keep your backend configuration DRY

Before diving into Terragrunt, let's first define the problem it solves. Consider the following Terraform project structure:

#./terraform/
.
├── envs
│   ├── dev
│   │   ├── backend.tf
│   │   └── main.tf
│   ├── prod
│   │   ├── backend.tf
│   │   └── main.tf
│   └── stage
│       ├── backend.tf
│       └── main.tf
└── modules
    └── foundational
        └── main.tf

In this scenario, we have a foundational module, with separate environments for dev, stage, and prod. As the complexity of the system grows, maintaining repeated backend configurations becomes more challenging.

Take, for example, the following backend configuration for the dev environment:

# ./terraform/envs/dev/backend.tf
terraform {
  backend "s3" {
    bucket         = "my-terraform-state"
    key            = "envs/dev/bakcend/terraform.tfstate"
    region         = "us-east-1"
    encrypt        = true
    dynamodb_table = "my-lock-table"
  }
}

This configuration is required for each environment (dev, stage, prod), and you'll find yourself copying the same code across all of them. This approach isn't scalable and quickly becomes difficult to maintain.

Now, let's see how Terragrunt simplifies this.

Introducing Terragrunt

With Terragrunt, you can move repetitive backend configurations into a single file and reuse them across all environments.

Here's how your updated directory structure looks:

# ./terraform/
.
├── envs
│   ├── dev
│   │   ├── backend.tf
│   │   ├── main.tf
│   │   └──terragrunt.hcl
│   ├── prod
│   │   ├── backend.tf
│   │   ├── main.tf
│   │   └── terragrunt.hcl
│   ├── stage
│   │   ├── backend.tf
│   │   ├── main.tf
│   │   └── terragrunt.hcl
└── terragrunt.hcl

The terragrunt.hcl file uses the same HCL language as Terraform and centralizes the backend configuration. Instead of duplicating code, we now use Terragrunt’s path_relative_to_include() function to dynamically set the backend key for each environment.

Here’s what that looks like:

#./terraform/envs/terragrunt.hcl
remote_state {
  backend = "s3"
  generate = {
    path      = "backend.tf"
    if_exists = "overwrite_terragrunt"
  }
  config = {
    bucket = "my-terraform-state"

    key = "${path_relative_to_include()}/terraform.tfstate"
    region         = "us-east-1"
    encrypt        = true
    dynamodb_table = "my-lock-table"
  }
}

By centralizing this, you only need to update the root terragrunt.hcl to apply changes across all environments.

Including root configuration

You can include the root configuration in each child environment by referencing the root terragrunt.hcl file like this:

#./terraform/env/stage/terragrunt.hcl
include "root" {
  path = find_in_parent_folders()
}

This drastically reduces duplication and keeps your backend configurations DRY.

Keep your provider configuration DRY

One common challenge in managing Terraform configurations is dealing with repetitive provider blocks. For example, when you're configuring AWS provider roles, you often end up with the same block of code repeated across multiple modules:

# ./terraform/env/stage/main.tf
provider "aws" {
  assume_role {
    role_arn = "arn:aws:iam::0123456789:role/terragrunt"
  }
}

To avoid copy-pasting this configuration in every module, you can introduce Terraform variables:

# ./terraform/env/stage/main.tf
variable "assume_role_arn" {
  description = "Role to assume for AWS API calls"
}

provider "aws" {
  assume_role {
    role_arn = var.assume_role_arn
  }
}

This approach works fine initially, but as your infrastructure grows, maintaining this configuration across many modules can become tedious. For instance, if you need to update the configuration (e.g., adding a session_name parameter), you would have to modify every module where the provider is defined.

Simplify with Terragrunt

Terragrunt offers a solution to this problem by allowing you to centralize common Terraform configurations. Like with backend configurations, you can define the provider configuration once and reuse it across multiple modules. Using Terragrunt’s generate block, you can automate the creation of provider configurations for each environment.

Here’s how it works:

#./terraform/env/stage/terragrunt.hcl
generate "provider" {
  path = "provider.tf"
  if_exists = "overwrite_terragrunt"
  contents = <<EOF
provider "aws" {
  assume_role {
    role_arn = "arn:aws:iam::0123456789:role/terragrunt"
  }
}
EOF
}

This generate block tells Terragrunt to create a provider.tf file in the working directory (where Terragrunt calls Terraform). The provider.tf file is generated with the necessary AWS provider configuration, meaning you no longer need to manually define this in every module.

When you run a Terragrunt command like terragrunt plan or terragrunt apply, it will generate the provider.tf file in the local .terragrunt-cache directory for each module

$ cd /terraform/env/stage/
$ terragrunt apply
$ find . -name "provider.tf"
.terragrunt-cache/some-unique-hash/provider.tf

This approach ensures that your provider configuration is consistent and automatically injected into all relevant modules, saving you time and effort while keeping your code DRY.

By centralizing provider configurations with Terragrunt, you reduce the risk of errors from manual updates and ensure that any changes to provider settings are automatically applied across all modules.

Installation

For installation instructions, please refer to the official documentation